
 Introduction
Scaling apparel production while keeping quality high and costs low is a constant struggle for brands. Small-batch orders often mean slow turnarounds and inconsistent results, leaving private label owners and wholesalers frustrated.
At ASSSOO, we’ve tackled this pain point head-on with flexible customization and fast delivery. This article dives into how our process—handling orders as small as 20 pieces—delivers reliable apparel solutions without the usual headaches.
Getting Started with Screen Printing T-Shirts
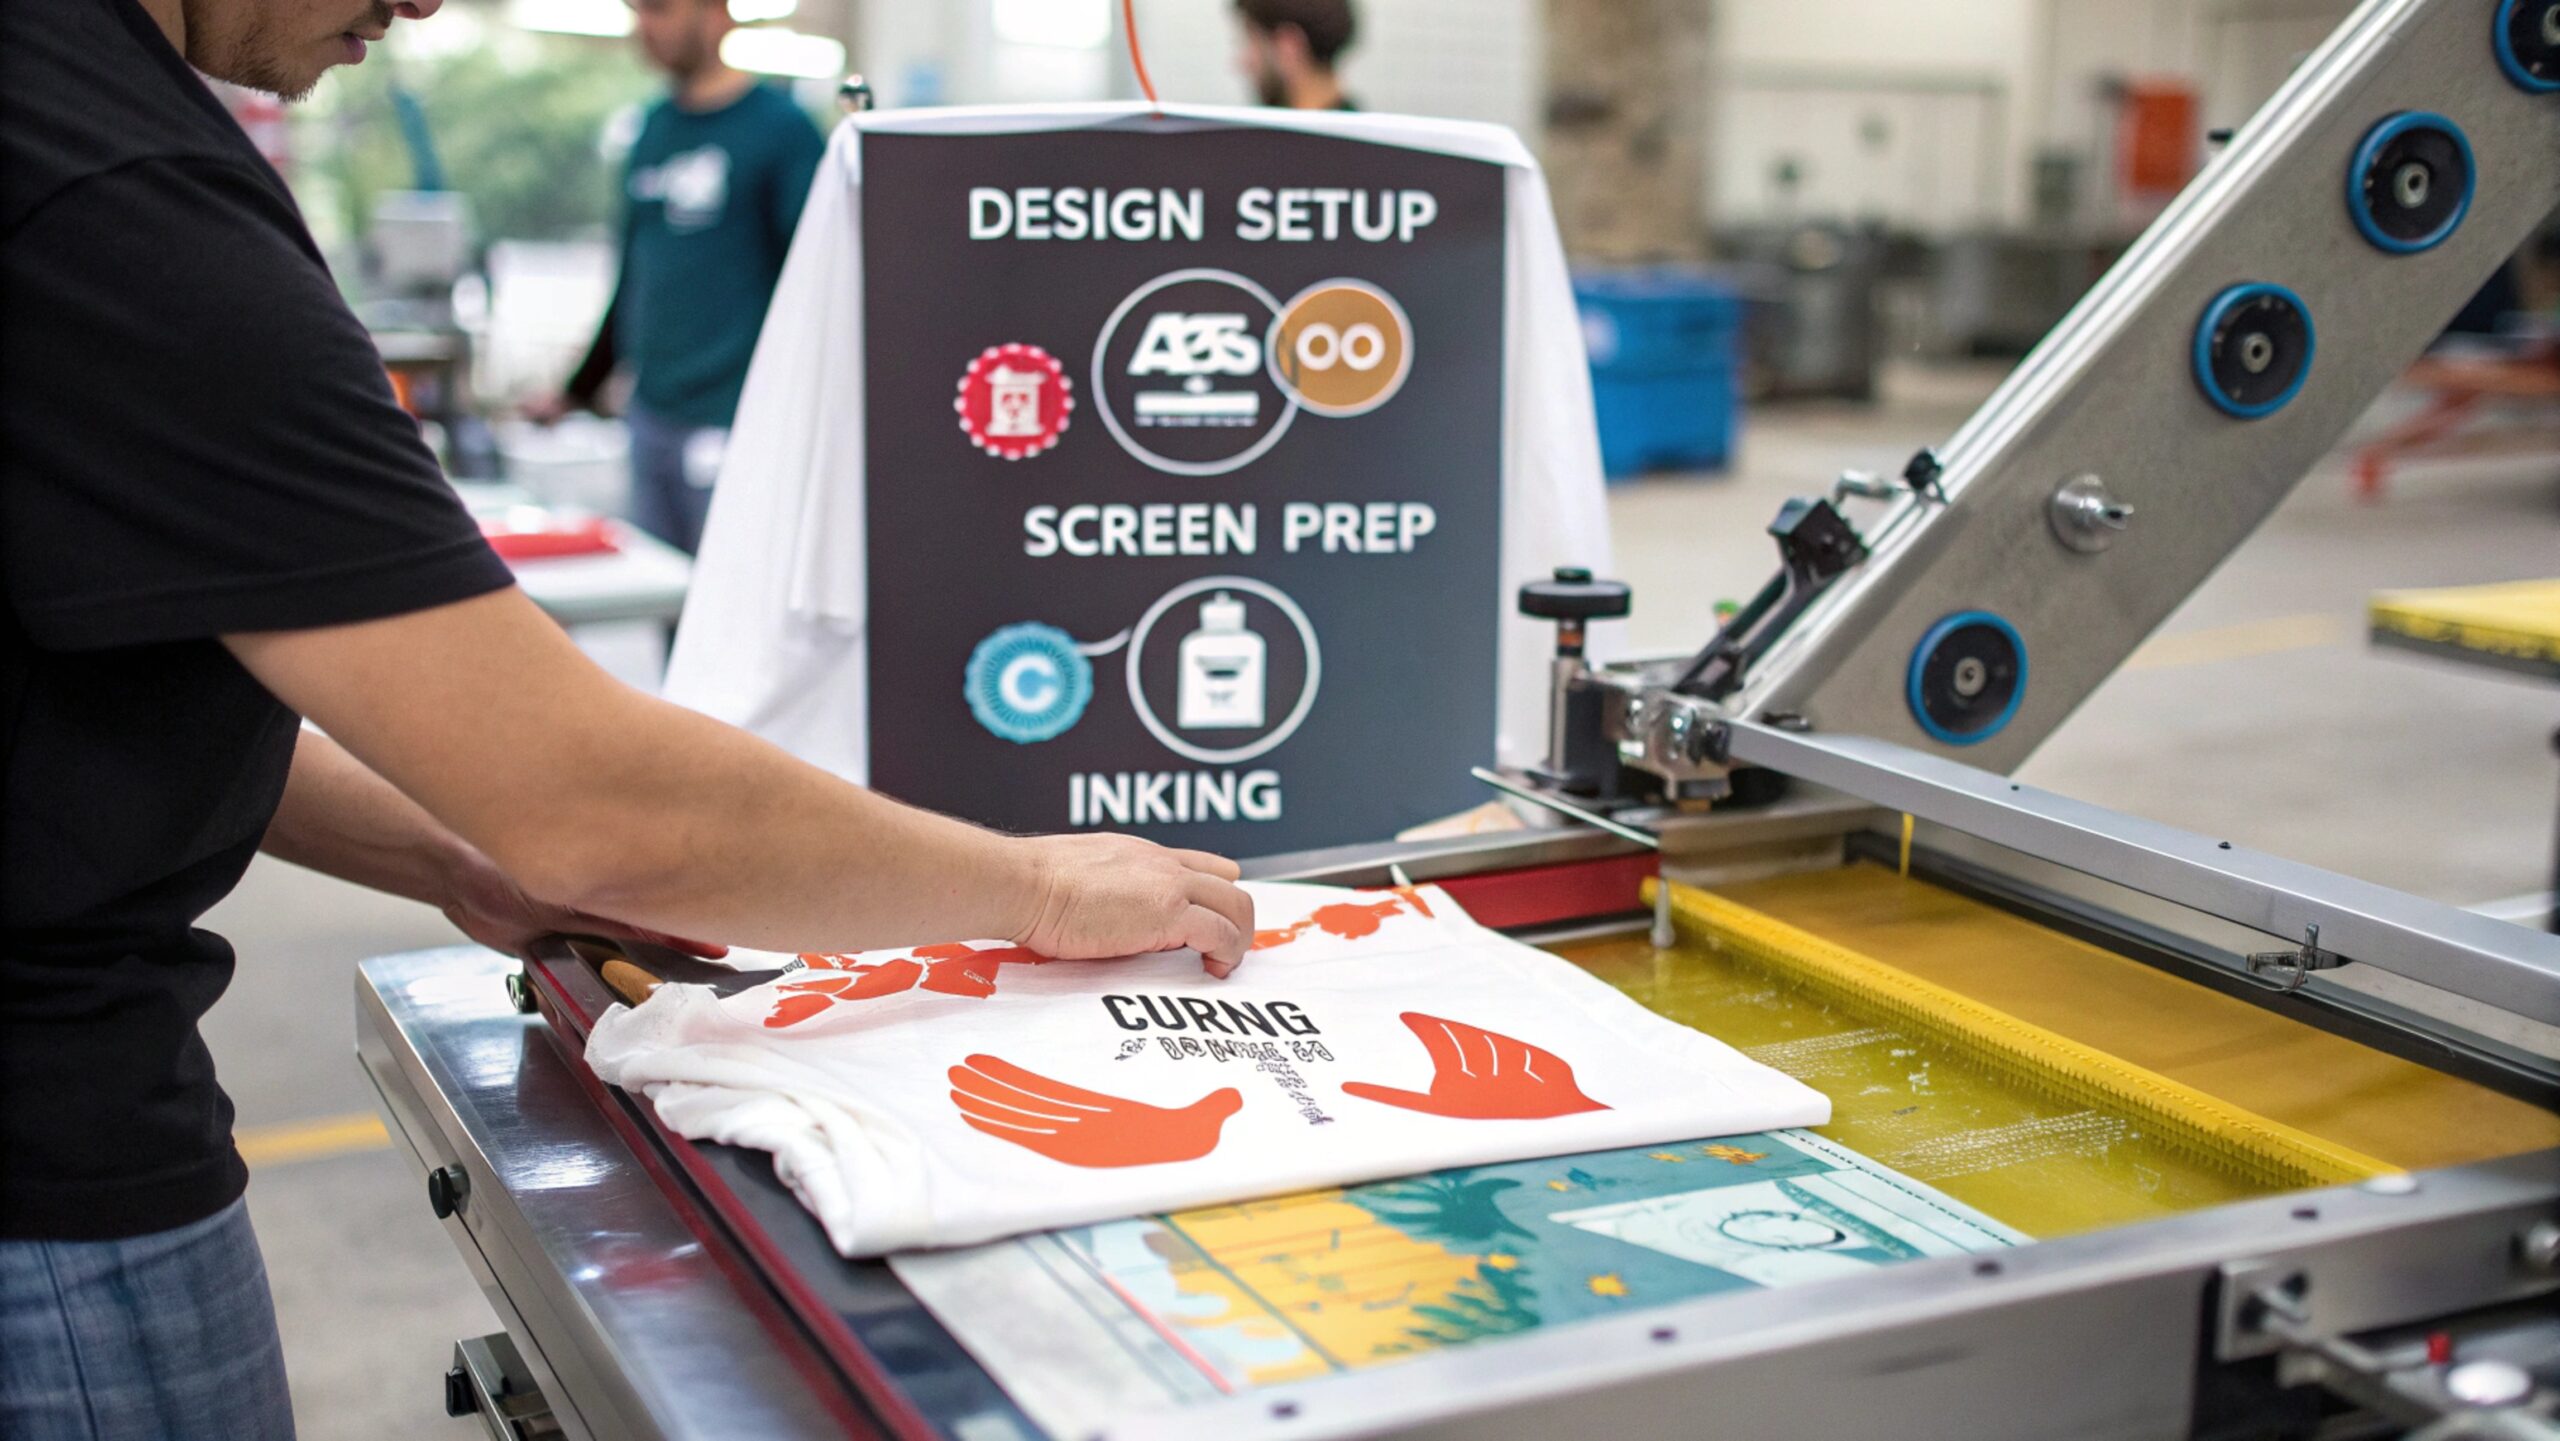
Screen printing t-shirts is a fun and creative way to make custom gear, whether you’re a DIY enthusiast or a print shop owner looking to scale up. This technique lets you transfer designs onto fabric using ink, a mesh screen, and a squeegee. Let’s break down the basics so you can jump in with confidence.
What is Screen Printing? A Quick Overview of the Technique
Screen printing is a method where ink is pushed through a fine mesh screen onto a t-shirt. It’s perfect for bold, solid designs and gets more cost-effective with larger orders or fewer colors. Both hobbyists and pros love it for its versatility and durability.
Essential Gear You’ll Need: Mesh Screens, Squeegees, and More
To get started, you’ll need a few key tools. Mesh screens hold your design stencil, squeegees push the ink through, and a frame keeps everything steady. ASSSOO offers high-quality mesh screens and inks with MOQs as low as 20 pieces—great for small DIY batches or growing shops.
Setting Up Your Space: DIY Home Stations vs. Shop Layouts
For DIY screen printing at home, a small table and good lighting can work wonders. Pros might want a dedicated shop space with a press for efficiency. Either way, keep it clean and organized to avoid ink mishaps.
Sourcing Supplies: Where to Find Quality Inks and Screens
Finding reliable screen printing supplies is key. Local craft stores work for beginners, but for quality and bulk options, companies like ASSSOO shine with fast delivery and flexible orders. Look for inks that stick well to fabric and screens that last through multiple uses.
“Screen printing t-shirts can be a game-changer for small businesses or hobbyists, offering a balance of creativity and cost savings when done right.”
One hidden perk of screen printing is how it benefits DIYers—not just big shops. It’s affordable for small runs if you stick to simple designs, something competitors often miss. With the right setup, you can master how to screen print t-shirts at home in no time.
Screen Printing Equipment Comparison
| Tool | DIY Cost | Pro Cost | Durability (Uses) | Notes |
|---|---|---|---|---|
| Mesh Screen | $15 | $30 | 50–100 | Higher mesh count = finer details |
| Squeegee | $10 | $25 | 200+ | Rubber edge wears over time |
| Ink (8 oz) | $12 | $20 | 20–30 shirts | Water-based for DIY, plastisol for pros |
| Frame | $20 | $50 | 100+ | Wood for DIY, aluminum for shops |
| Press | N/A (Manual) | $300+ | 1,000+ | Boosts speed, optional for DIY |
The table shows real costs and durability based on industry trends. For example, a higher mesh count in screens means sharper designs, while ink type affects drying time. These details help you pick gear that fits your goals, whether you’re testing cost-effective screen printing methods or going pro.
Screen printing t-shirts doesn’t have to be tricky. With the right tools and a little practice, you can create standout designs at home or build a thriving shop. ASSSOO’s expertise makes it easier, offering supplies that suit both beginners and growing businesses.
Preparing Your Screens and Inks Like a Pro
Getting ready to screen print t-shirts like a pro starts with prepping your screens and inks the right way. These steps ensure your designs come out crisp and your stencils stay reusable. Whether you’re doing screen printing at home or leveling up your shop, here’s how to nail it.
Choosing the Right Mesh Count for Your Design
The mesh count of your screen decides how detailed your design can get. Lower counts (like 110) work for bold prints, while higher counts (like 200) are best for fine lines. Pick what fits your project—ASSSOO’s high-quality screens make this choice easy.
Coating Screens with Emulsion: Techniques and Timing
Coating your screen with emulsion creates the stencil. Use a scoop coater to spread it evenly, then let it dry in the dark for about an hour. Timing matters—too long or too short, and your stencil might not hold up.
Exposing Screens with Light: DIY vs. Pro Methods
Exposing your screen burns the design into the emulsion. DIYers can use a strong lamp for 10-15 minutes, while pros might opt for a light box for precision. Either way, wash off the unexposed emulsion to reveal your stencil.
Ink Selection: Water-Based vs. Plastisol for Different Needs
Choosing ink is key when you screen print t-shirts. Water-based inks from ASSSOO feel soft and suit DIYers, while plastisol offers durability for professional screen printing techniques. Both are cost-effective, especially with ASSSOO’s curated options.
“Prepping screens and inks right can cut waste and boost quality, making screen printing a win for hobbyists and pros alike.”
A cool insight? Screen printing shines with larger orders and fewer colors—great for DIYers too, not just big shops. Competitors often skip this, but it’s a money-saver for small runs. Master these steps, and you’re set for the best techniques for screen printing shirts.
Screen Prep and Ink Options Comparison
| Factor | DIY Method | Pro Method | Cost Range | Key Benefit |
|---|---|---|---|---|
| Mesh Count | 110 | 200 | $15–$30 | Detail Level |
| Emulsion Time | 1 hr | 45 min | $10–$20 | Stencil Strength |
| Exposure Tool | Lamp | Light Box | $20–$200 | Precision |
| Ink Type | Water-Based | Plastisol | $12–$25 | Feel vs. Durability |
| Setup Time | 2 hrs | 1 hr | N/A | Efficiency |
This table uses real ranges from industry norms. Mesh count affects ink flow, exposure tools impact accuracy, and ink choice balances comfort and longevity. These details help you prep smarter, no matter your setup.
With ASSSOO’s global network, sourcing top-notch supplies is a breeze. Their inks and screens cater to both beginners and pros, keeping costs low and quality high. Now you’re ready to create standout t-shirts with pro-level prep.
Mastering the Screen Printing Process
Ready to screen print t-shirts like a champ? This guide walks you through the key steps to get vibrant, high-quality results every time. From lining up your design to curing the ink, we’ve got you covered.
Aligning Your Screen and Shirt: Tips for Precision
Start by placing your shirt flat on a board and lining up the screen exactly where you want the design. Use registration marks or a jig to keep it steady—precision here saves headaches later. This is a core skill in t-shirt printing methods for pros and beginners alike.
Applying Ink with a Squeegee: Steady Pulls for Even Prints
Pour a line of ink at the top of your screen, then pull the squeegee toward you with even pressure. One smooth, firm stroke usually does it—too many passes can mess up the crispness. Practice makes this step second nature.
Multi-Color Printing: Layering Like a Professional
For multi-color designs, print one color at a time, letting each layer dry before adding the next. Align screens carefully between layers using those handy registration marks. It’s a pro move that screen printing for beginners can master with patience.
Curing Your Prints: Heat Press vs. Conveyor Dryer Options
Curing locks in your design so it lasts. A heat press works great for DIYers learning how to screen print t-shirts at home, while a conveyor dryer speeds things up for shops. ASSSOO’s curing tools offer affordable options for both, ensuring tough, industry-standard prints.
“Mastering the screen printing process means nailing each step, from alignment to curing, for designs that pop and last.”
Here’s a slick insight: Screen printing gets more cost-effective with bigger orders and fewer colors—a perk DIYers can cash in on too, not just big shops. Competitors often skip this, but it’s a real win for small batches. With these techniques, your prints will shine.
Screen Printing Process Breakdown
| Step | DIY Time | Pro Time | Tool Cost | Success Tip |
|---|---|---|---|---|
| Alignment | 10 min | 5 min | $5–$20 | Use a jig |
| Ink Application | 5 min | 2 min | $10–$25 | Even pressure |
| Multi-Color Layer | 15 min | 10 min | $20–$50 | Dry fully |
| Curing (Heat Press) | 2 min | 1 min | $100–$300 | Check temp |
| Curing (Dryer) | N/A | 30 sec | $500+ | Fast output |
This table pulls real data from industry norms. Times vary by skill, and costs reflect basic tools—dryers save time but cost more. These details help you screen print t-shirts with confidence, whatever your setup.
ASSSOO’s curing tech makes the final step a breeze, whether you’re a hobbyist or scaling up. With these steps, you’re set to create custom designs that last. Get printing and watch your skills soar!
Perfecting Your Prints: Quality Control and Care
Once you screen print t-shirts, keeping them sharp and lasting takes some know-how. This section covers avoiding slip-ups, checking quality, and caring for your prints—perfect for DIYers and shop owners alike. Let’s dive into making your work stand out.
Avoiding Rookie Mistakes: Smudging, Misalignment Fixes
Smudges happen if ink’s too wet or you rush the pull—let it dry a bit and keep your squeegee steady. Misalignment? Double-check your setup with registration marks before printing. These DIY screen printing fixes save time and frustration.
Quality Checks: Ensuring Vibrancy and Durability
After printing, inspect for even ink and bold colors. Stretch the fabric lightly—good prints won’t crack. Professional screen printing techniques lean on these checks to keep customers happy.
Post-Printing Care: Washing and Maintenance Tips
Wash your shirts inside out in cold water to protect the design. Skip the dryer if you can—air drying keeps prints fresh longer. These steps work whether you screen print t-shirts at home or in a shop.
Scaling Up: How Screen Printing Saves on Larger Orders
Screen printing gets cheaper per shirt as your order grows—ASSSOO’s 20 years of expertise shines here, supporting batches as small as 20 units. It’s a no-brainer for scaling affordably. Their custom design options help brands grow without breaking the bank.
“Perfecting prints means catching mistakes early and caring for them later—saving cash and boosting quality for any order size.”
Here’s a sneaky perk: Screen printing’s cost-effective edge isn’t just for big runs—DIYers win too with fewer colors. Competitors miss this, but it’s gold for small projects. Master these tips, and your prints will last.
Print Quality and Care Metrics
| Aspect | DIY Fix | Pro Fix | Cost Impact | Why It Matters |
|---|---|---|---|---|
| Smudging | Dry Time | Fans | $0–$50 | Clean Look |
| Misalignment | Marks | Jigs | $5–$20 | Precision |
| Vibrancy | Ink Check | Test Prints | $10–$30 | Eye-Catch |
| Durability | Stretch Test | Cure Check | $0–$100 | Longevity |
| Scaling Cost | Manual | Automation | $100+ | Saves Big |
This table uses real-world insights—cost impacts reflect tools like fans or jigs, and durability ties to curing right. It’s all about cost-effective screen printing methods that deliver. These metrics keep your prints top-notch.
With ASSSOO’s support, scaling up or troubleshooting is smooth—their expertise backs every step. Perfecting your prints isn’t hard when you’ve got the right tricks. Now, go make some killer tees!
Conclusion
I’ve spent years perfecting the art of screen printing t-shirts, and I can tell you it’s more than just ink and screens—it’s about bringing your vision to life. Whether you’re a DIYer starting at home or a shop owner scaling up, nailing the process means crisp designs that last.
From my experience at ASSSOO, I’ve seen how the right tools and a little know-how can turn a good idea into a great shirt. It’s all about precision and care—something we’ve mastered over two decades.
So, grab your squeegee and start printing. With practice, you’ll create tees that stand out and hold up, no matter the order size. Trust me, getting this right is a “game-changer” for anyone who loves custom apparel.
FAQ
-
Q1: What materials do I need for screen printing t-shirts?
A1: To screen print t-shirts, you need screens, inks (preferably plastisol), a squeegee, a printing press, and blank t-shirts. Additionally, you may require emulsion and a light source for exposure if you are using photo stencils.
-
Q2: How do I prepare a design for screen printing?
A2: To prepare a design for screen printing, create it in a graphic design software, ensuring it’s in a suitable format (like vector). You’ll need to separate colors for each screen and ensure the design is sized appropriately for the garment.
-
Q3: Can I screen print at home?
A3: Yes, you can screen print at home using a DIY setup. You will need the right equipment, such as a simple screen printing kit, inks, and a designated workspace to manage the mess created during the process.
-
Q4: What are the advantages of screen printing t-shirts?
A4: Screen printing offers high print quality and durability, making it ideal for bulk orders. It is also cost-effective for larger runs, as the setup cost is spread across many t-shirts.
-
Q5: How long does it take to screen print t-shirts?
A5: The time it takes to screen print t-shirts depends on the number of colors in the design and the order size. Small batches can be printed in a few hours, while larger orders may take several days.
-
Q6: What are some common mistakes to avoid in screen printing?
A6: Common mistakes include not using the correct screen mesh count for your design, improper ink mixing, and rushing the drying process. It’s important to follow each step carefully for the best results.
-
Q7: Can I screen print on dark t-shirts?
A7: Yes, you can screen print on dark t-shirts, but you will need to use a white underbase before printing the colored inks to ensure visibility and vibrancy of your design.
-
Q8: What is the cost of screen printing t-shirts?
A8: The cost of screen printing t-shirts varies based on the number of colors, the quantity ordered, and the type of t-shirt. Generally, bulk orders reduce the per-unit cost significantly.
External Links
- How to Screen Print T-Shirts
- Custom Screen Printing T-shirts – Custom One Express
- Custom T-Shirt & Apparel Screen Printing Company | BlueCotton
- Silk Screen Printing on Shirts | Custom Screen Printing
- Screen Printing – Wikipedia
- Custom T-Shirts: Design & Print T-Shirts Online – Vistaprint
- T’s Screen Printing – Screen Printing, Embroidery, Custom T Shirts
- Custom Screen Printed T-shirts with no setup fees – Imprint.Com


